Quickbooks (QBO) Integration
Celoxis App for QuickBooks Online helps you to synchronize billable time entries with Celoxis and your QuickBooks Online company. It facilitates quick and accurate Invoice generation. Users can sync all approved and billable time entries from Celoxis to QuickBooks for Invoicing and once they are Invoiced in QuickBooks they can be updated back in Celoxis as Invoiced.
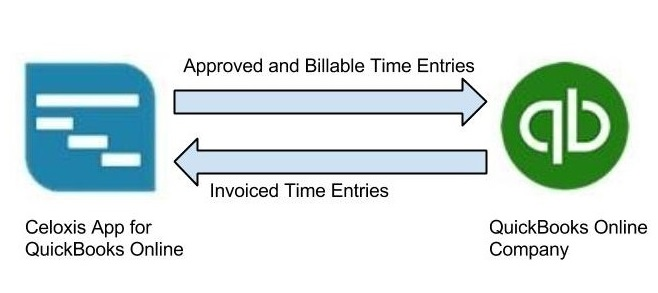 High level Data flow between Celoxis and QuickBooks Online
Data Mapping between Celoxis and QuickBooks Online
The terms used in QuickBooks Online are different than those in Celoxis. For example, a Time Entry in Celoxis is known as Time Activity in QuickBooks Online. The below table explains the field mapping between Celoxis and QuickBooks Online.
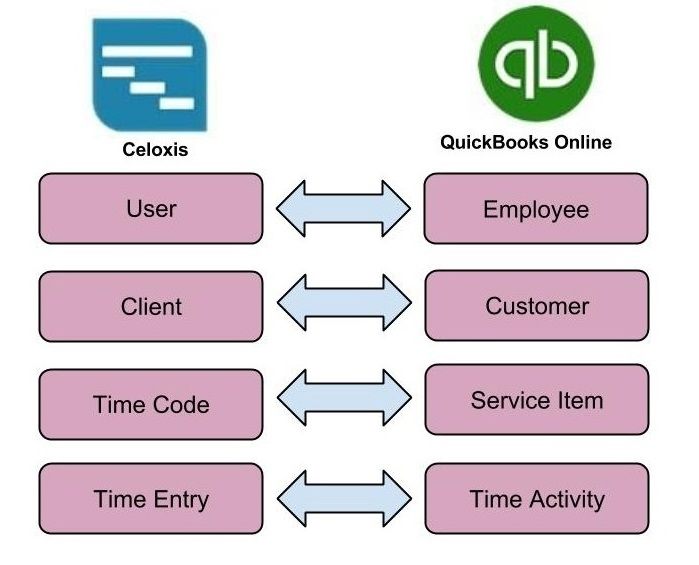 Data Mapping between Celoxis and QuickBooks Online
Before Using the App
Celoxis does not create or import supplementary data associated with time entries from QuickBooks Online. Supplementary data includes users, clients and time codes. It is imperative to follow the below steps.
Mapping Users
- You need ensure all your existing Users in Celoxis exist in QuickBooks Online as Employees.
- The display name of an employee in QuickBooks Online should be identical to display name of an user in Celoxis.
- Celoxis performs name based matching between associated entries during sync operation.
Mapping Clients
- You need ensure all your existing Clients in Celoxis exist in QuickBooks Online as Customers.
- The display name of a customer in QuickBooks Online should be identical to display name of a client in Celoxis.
- Celoxis performs name based matching between associated entries during sync operation.
Mapping Time Codes
- You need ensure all your existing Time Codes in Celoxis exist in QuickBooks Online as Service Items.
- The display name of the Time Code in QuickBooks Online should be identical to display name of a Service Item in Celoxis.
- Celoxis performs name based matching between associated entries during sync operation.
Connect Celoxis to QuickBooks Online
Only users with admin privileges can connect to QuickBooks Online. Once the connection is established all users (with Invoice Privilege) can sync time entries between the two systems. Before you connect to QuickBooks Online, please ensure that you have completed all steps listed in the Before Using the App section.
Following steps will guide you to connect the Celoxis App to your QuickBooks Online company:
- Go to Top Menu ▸ ▸ Admin page.
- Under Timesheet section, click on Connect with QuickBooks Online (BETA)

- You will get a pop-up to Connect to Quick Books Online. Click on "Connect to QuickBooks" button. This will initiate Intuit's authentication process.

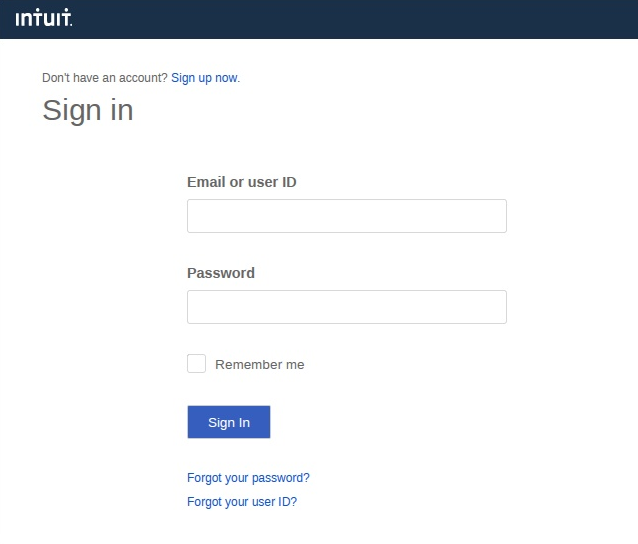
- On the next screen, you will be prompted to enter your QuickBooks Online credentials.
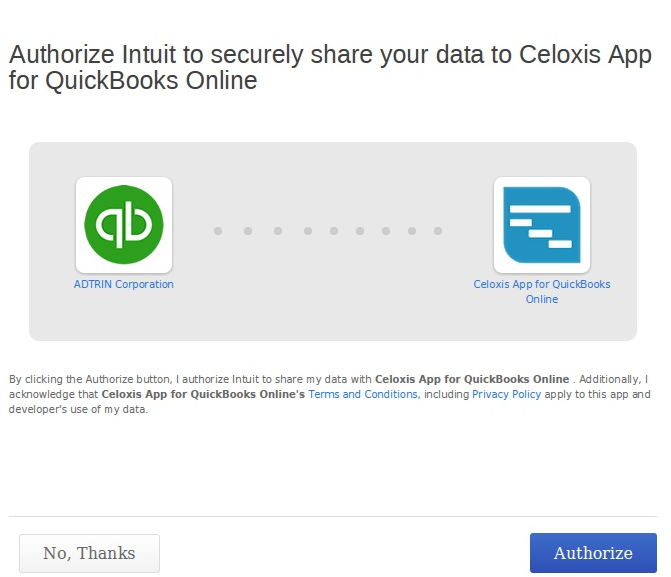
- Click on the "Authorize" button. By doing this, the admin authorizes QuickBooks Online company to securely share data with Celoxis App for QuickBooks Online.
- The pop up automatically closes and your Company Settings page is refreshed. You are now connected to QuickBooks Online.
"The web-site domain of the application requesting access to your Intuit data does not match what we have on file. Please proceed at your own risk".
When we register our App with Intuit, we have to provide a host domain. This in our case is "celoxis.com". Since on-premise users are trying to access from their own server (and domain), Intuit tries to warn you of this domain mismatch. Please be assured there is no security risk involved and you can safely ignore this message.
Access Expiration
Every authenticated connection remains active for 180 days, after which QuickBooks Online automatically expires it for security reasons. Admins are required to Connect to QuickBooks Online again.
If your connection expires, your users will not be able to sync time entries with QuickBooks Online. They will see an authentication failure message. Once the admin reconnects to QuickBooks Online, they will be able to resume normal operation.
Disconnect from QuickBooks Online
At times you may want to explicitly discontinue using QuickBooks Online. Only admins are authorized to disconnect from QuickBooks Online. Once the app is disconnected, users can no longer sync time entries with QuickBooks online and all Celoxis time entries will resume the default Invoicing behavior.
Please refer the following steps to disconnect access from QuickBooks Online company.
- Go to Top Menu ▸ ▸ Admin page.
- Under Timesheet section, click on Disconnect from QuickBooks Online.
- You will have to confirm your action by clicking 'Yes'.
- The Company Settings page will reload and your connection to QuickBooks Online will be disconnected. You will again see Connect with QuickBooks Online option.
Sync Time Entries
The Celoxis app for QuickBooks Online provides "Sync with QuickBooks Online (BETA)" report which lists all your Celoxis Approved & Billable Time Entries. This is particularly helpful when you want to see details of entries, if they are synced and date when they were synced. You can also apply dynamic filters (Date, Client name and Manager name) to further refine the data in your reports.
Sync with QuickBooks Online report provides two new columns, "QuickBooks Online Id" and "Last synced at" . "QuickBooks Online Id" column displays the time entry's corresponding ID in QuickBooks Online and "Last synced at" column shows the time stamp when the entry was synced. Blank values indicate the entry is yet to be synced with QuickBooks Online company.

Steps to sync time entries
- Select the time entries you want to sync.
- Click on bulk actions menu icon and select Sync with QuickBooks Online action.
- The system will sync the selected time entries and corresponding QBO Ids and Last synced values will be updated.


Once entries are Invoiced, they will no longer appear under the "Sync with QuickBooks Online" report.
Sync Rules
Using the 'Sync with QuickBooks Online' action from Sync with QuickBooks Online Report
The below table explains actions performed by the system when sync operation is explicitly performed from the Sync with QuickBooks Online Report
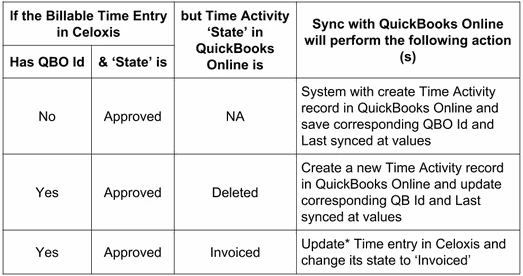
Please note that once a time entry is Invoiced, it will not be seen in the "Sync with QuickBooks Online" report.
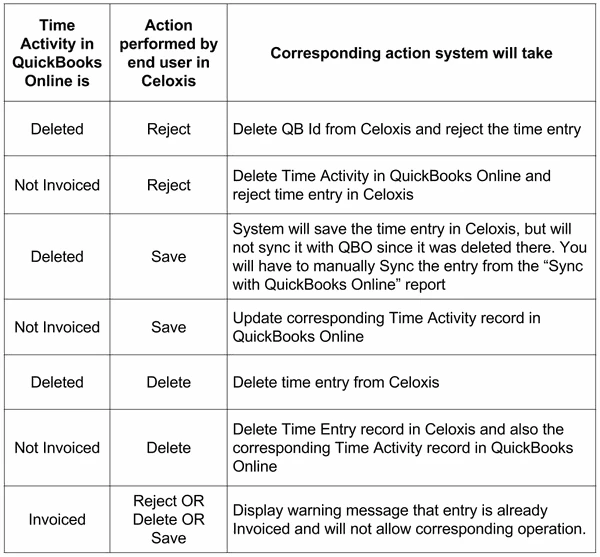
Single/Bulk Actions of Approved & Billable Time Entries (Previously synced with QuickBooks Online)
The below table explains the system behavior for Bulk or Single edit actions performed on previously synced approved & billable time entries. System will dynamically sync the selected time entries.
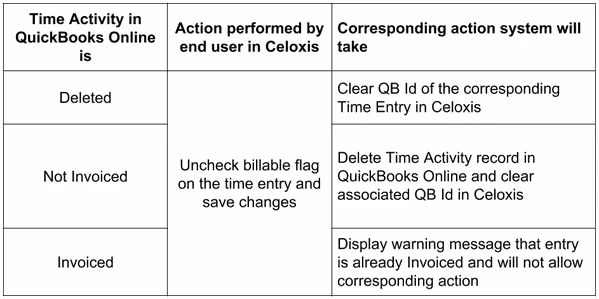
Special Conditions if Billable flag is "unchecked" on Approved & Billable Time Entries (Previously synced with QuickBooks Online)
Single Edit Screen for Invoiced Time Entries
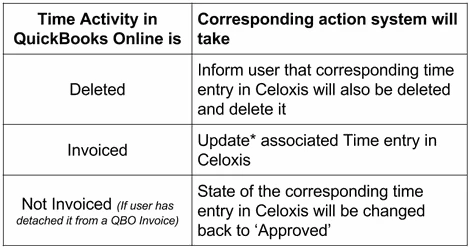
Once Entries are Invoiced in QuickBooks Online, and synced back into Celoxis, their state will be updated to 'Invoiced'. Such entries will be locked for any further edits (edit or delete) from Celoxis. On the single edit screen, you will have a "Sync" button. This button allows you to update* entries in Celoxis, if they have been altered in QuickBooks Online.
The below table explains actions performed by the system when sync operation is explicitly performed on Invoiced Time entries from the Single edit screen.
How to edit the Invoice in QBO
Once Time is Invoiced in QBO, further modifications are prohibited in Celoxis. This must be done from QBO. However, you cannot directly edit the Invoice. Changing the hours in the QBO invoice will not update the time entry in Celoxis. Instead, QBO expects you to unlink the line item from the Invoice, Edit the Time Entry separately, and then link it back to the Invoice. Here’s how you should Edit your Invoiced Time in QBO.
- In QBO, Go to Invoice > Edit > Unlink the Time Entry > Save.
- Locate the unlinked Time Entry in QBO > Edit and Make the required changes > Save.
- Go to the Invoice > Edit > Link the Time Entry > Save.
Once you save this Invoice in QBO, you need to sync this time entry in Celoxis, and the Time Entry will be updated in celoxis.
Common errors while syncing entries
Below are few errors that you may encounter while syncing time entries with QuickBooks Online.
- Error: Employees Missing in QuickBooks Online
Reason: This error occurs when the user's name in Celoxis and QuickBooks Online company is not identical or the user is not available QuickBooks Online.
Solution:
a. Confirm if user has been set up in QuickBooks Online.
b. Make sure that the Name in Celoxis matches the Display Name in QuickBooks Online.
- Error: Customers Missing in QuickBooks Online
Reason: This error occurs when the client's name in Celoxis and QuickBooks Online is not identical or the client is not available in QuickBooks Online.
Solution:
a. Confirm if client has been set up in QBO.
b. Make sure that the Name in Celoxis matches the Display Name in QuickBooks Online.
- Error: Time codes Missing in QuickBooks Online
Reason: This error occurs when the time code's name in Celoxis and QuickBooks Online is not identical or the time code (service item) is not available in QuickBooks Online.
Solution:
a. Confirm if the service item has been set up in QBO.
b. Make sure that their names are identical.
- Error: ERROR CODE:3200, ERROR MESSAGE:message=ApplicationAuthenticationFailed; errorCode=003200; statusCode=401, ERROR DETAIL:null
Reason: This error occurs typically when your access token has expired.
Solution:
a. Please ask your admin to connect to QuickBooks Online from the Company Settings page in Celoxis.
- Error: Feature Not Supported
Reason: This error occurs when you connect to a QuickBooks Online Edition that does not support Time Entries
Solution:
a. You need upgrade your current version of QuickBooks Online to a version which supports Time Entries.
Switching to QuickBooks Online
If you are an existing Celoxis user and have been Invoicing Time entries in Celoxis, please take note of the following:
- Agree at an organization level on the date on which you would switch to invoicing with QuickBooks Online. This is important because once you connect to QuickBooks Online, your users cannot explicitly Invoice time entries (i.e. using the 'Invoice' action) in Celoxis.
- All Previously Invoiced time entries will continue to exist as is. They will not be automatically synced with QuickBooks Online. These entries will continue the default Invoicing behavior till the time they are explicitly “UnInvoiced” by a privileged user. Once “UnInvoiced” they can be synced with QuickBooks Online.
Please a note the behavior of the system when you switch to QuickBooks Online, i.e. using “Connect to QuickBooks” on Company Settings page.
Existing Invoiced entries will continue to function as-is, i.e. they can be UnInvoiced/Deleted/Edited as before. Once “UnInvoiced”, they can only be Invoiced through QuickBooks Online using the sync functionality.